Showing posts with label nursery. Show all posts

Thursday, May 6, 2010

creating room for baby

So apparently a week turned in to 3... my apologies on the delay in getting this update out! I know you are all anxiously awaiting details on how Camille of styLe handLer and I implemented our final nursery proposal in our dear friend Sarah's nursery, so wait no longer! All the details on this DIY project are below:

Once we had the design and color palette finalized and Sarah and Dan's approval to proceed, Camille and I blocked off a Friday and Saturday to execute the design.

Based on feedback from Sarah on the design of the tree, I brought the image in to Adobe Illustrator and did a live trace using the image of the simple tree with owls that we had identified from my first blog post. With the image in Illustrator, I was able to expand the image to 1:1 scale (for those of you unfamiliar with archi-speak, this mean that I expanded the file to life size). Just to put it in to perspective, Sarah's tree is almost 7 1/2' tall by 6' wide, which meant that the file I created was set on a virtual canvas of the same size!

Once I had the tree at 1:1 scale, I converted the file to Photoshop format, which allowed me make some more precise editions to the design. Sarah didn't want the owls on the tree, so I removed them and created new branches to fill out the blank spots. I also change the proportions a bit to work with the size of the nursery wall.

The ultimate goal in all of this prep work in Illustrator and Photoshop was to create live-size stencils to allow Camille and I to most accurately reproduce the tree on the nursery wall. Since the large format plotter I used maxed out at a paper size of 34" x 44" sheets, I had to section off the artwork to fit on the paper. The tree ended up filling five 34" x 44" sheets of paper!

The image below shows two of the five plots that were created. You can see that I put a border 1" into each of the sheets with numbered corners. This helped me piece the sections together in the end. The image within the 1 inch border was actually overlap from one sheet to the next, ensuring that none of the image would be cropped out due to printing margins.


After the plots were complete, the next step was to use an utility knife to cut out the tree form. The image below shows my progress on one of these sections... this was probably the most time consuming (although essential) part of the process!


Once I had completed cutting out the stencils, Camille and I methodically taped the pieces of paper to the wall. Imagine 3' by 4' paper snowflakes... this is how delicate some of the sheets ended up being! We had to very carefully line up the sections and tape them to the wall while keeping each sheet square so as not to distort the design.

A Helpful Hint: If you try this at home, start with the bottom piece to make sure you have the correct placement of the artwork. Then begin placing the sheets taping from the top first and then straightening downward.


The image below shows our progress. You will also notice that we taped over some of the more delicate leaves and branches. The purpose of the stencil was to allow us to trace the image on the wall accurately; it would not have been a good idea to paint directly over this paper stencil.


After we had traced the stencil with pencil, the paper came down and the paint started to go up! This was the fun part... I would, however, recommend purchasing some high quality brushes that come in smaller sizes (1/4" up to 2"). The edging can be difficult if you want nice crisp lines without these smaller brushes.


The final mural turned out amazingly! Camille and I were both pleased with the outcome and, more importantly, Sarah and Dan loved the final product.

I also must commend Sarah on her excellent foresight into the selection of the color palette for this room. The gray and cream, although atypical for a nursery, turned out perfectly. I love this space and cannot wait to see 'baby b' sleeping under this tree!

Sunday, April 18, 2010

designing room for baby

Back in January I gathered a bunch of baby inspiration for the design of my friend Sarah's nursery and posted some of my finds in the blog entry "make room for baby!" With the baby due in June, time is of the essence, so my friend and fellow design enthusiast Camille (style handler) and I have been busy over the last month preparing the final design proposal for baby b's new bedroom.

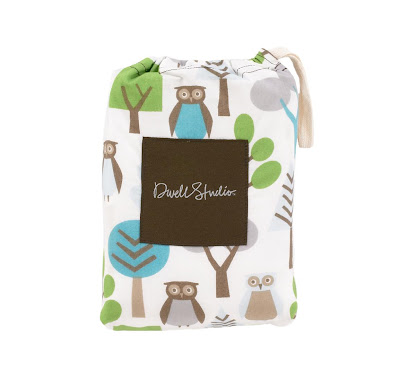
In my original post, I focused on many woodland themed elements, which became the inspiration for the room. Sarah knew she wanted a warm gray wall color with cream accents, which I immediately latched on to since it is such a fun and unusual palette! She and her husband Dan also picked out some adorable black furniture, which would be accessorized with the the cutest owl sheets from Dwell Studio.


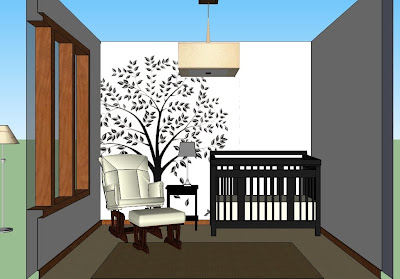
After a trip down to her house to get measurements of the space, I immediately began a 3D model of the room using SketchUp (a free Google software for any of you interested in a fantastic design tool). Once I had the room in place, I modeled the crib and some of the other pieces of furniture in the room to get a very clear understanding of space and layout.

Once I had modeled the space, Camille and I sat down for a design session to figure out where to place the various pieces of furniture and what to do with the walls. It was during this session that we came up with our first iteration for the nursery (see below). We placed a large silhouette of a tree on the wall between the crib and the rocking chair to give a fun, yet simple and calming, design element to the room.


We loved this design as a starting point, but decided to work on the form of the tree to make it a bit more simplified. We also knew that the final design would need to work with light tree on a darker wall, so bigger and bolder shapes would probably work best.

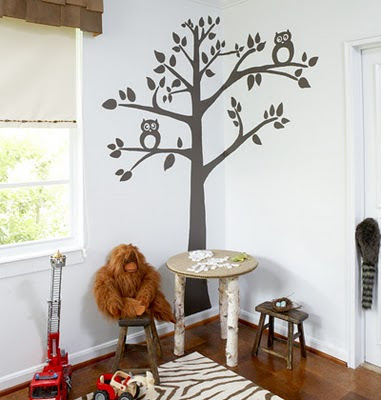
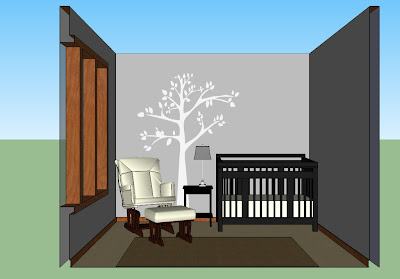
After a trip to Home Depot to hash out the final paint color scheme (we ended up with a gorgeous warm gray and light buttery cream palette), we looked through some various tree designs with Sarah and came to one of the images I had originally posted on my blog. We loved the simple design of this tree, but decided to remove the owls and change the proportions a bit.


Once we had finalized the design, I uploaded the new tree into the SketchUp model so that I could provide Sarah with a final preview of the concept for the nursery before we began work on the space.

With Sarah on board, all we needed to do was start painting! I'll post more details this week...

Sunday, January 10, 2010

make room for baby!

Today's post is in honor of my good friend Sarah's recent birthday and the upcoming arrival of her first child. She has asked our friend Camille (fellow blogger of the styLe handLer) and me to work on the design of her nursery, so I wanted this post to jump start a creative session on ideas for great nursery designs. Let's get the juices flowing...

As a first stop, I found the image below of a nursery designed by M Design Interiors out of Los Angeles. There are a lot great things about the space - it's bright, relaxing, and cheerful without being too over-the-top. I love the simple drum light at the center of the room and the overstuffed rocker. However, Sarah does not want her nursery to have the typical and overused safari animal theme and Camille and I were leaning towards more of a woodlands theme with owls or birds.


Let's move on...


image via M Design

The drum light in the room above is fabulous, so continuing that train of thought, here are a couple other light fixtures that could work wonderfully in a nursery.

The "Porcini Canopy" lights below were designed by memaké, a collaboration between designers Jaquie Hagan and Madeleine Potter. I love the texture of these lights and think they would make an interesting statement paired over a crib, although the ruffle-like shade may be more appropriate for a girls room than a boys.

image via Contemporist

Another fixture that adds fantastic texture while being a bit less feminine is this Le Klint Pendant by Design Within Reach. This fixture would make a great statement at the center of your nursery, while the neutral color and simple material tones it down enough not to overpower the decor.


The furniture you select for the nursery is one of the largest and most permanent investments a couple will make for the space. Thankfully, there are fabulously simple, timeless, and adaptable furniture options out there that help make this investment a little less scary.

With the Classic Crib set by Oeuf you can get a beautiful crib that has a light, cheerful, yet neutral color palette that can be converted into a toddler's bed easily. The simple design would not become outdated as easily as some of the more trendy crib sets, allowing it to be reused in the future.

images via Oeuf

Another gorgeous crib and changing table set is the Sahara Crib with the Delphi Changing table by Argington. I love the combination of white and dark wood, which really makes this furniture pop within the room. The clean and simple lines of the pieces are wonderfully contemporary and offer an uncluttered, fresh, and relaxing feel.

image via Pacifier

Great furniture for baby is crucial to a fabulous nursery, but Mom needs a great seat as well and I'm loving some of the stuffed gliders on the Pacifier website.

The Vola Glider by Monte Design pictured below is not only pretty, it is ergonomically designed with arm heights perfect for feeding. That super cute stripped pillow is not just aesthetic, it offers lumbar support and can be removed if desired. Finally, the chair (and pillow) come in a variety of colors with an optional and glide-able ottoman to match!


image via Pacifier

Crib bedding is a fun way to liven up your nursery and is one of the items that is easy to change for your second or third child if your original selection starts to look out-of-date. Given that bedding is one of the less permanent aspects of your nursery, it's a great and safe place to get creative and use some trendy designs or colors.

I already know Sarah loves the Owls Crib Set by DwellStudio and I'm loving her taste... DwellStudio has a fabulous collection of unique baby bedding in fun color patterns and interesting subjects. I've shown a few of my favorites below.

Owls Crib Set

Sparrows Crib Set

Gio Crib Set
images via Pacifier

Another company that offers beautiful modern bedding and linens is Amenity Home, which specializes in organic and eco-friendly fabric products for the home. Their line of baby bedding is adorable and would totally fit a woodlands themed nursery. I love the animal subjects and retro color palette... again, bedding and pillows are safe ways to add some trend to your nursery since they are so easy (and much more affordable) to replace!

images via Amenity

Rather than focusing too much on creating a vibrant and playful nursery that may feel chaotic and busy for a new mom learning to care for a baby for the first time, an alternative could be to use a very soft palette on the walls, furniture, and bedding and then introduce a large and colorful area rug to bring some life into the room as shown below.

I do love how the bright colored swirls on the area rug enlivens the space and keeps the room from feeling static. With a nursery similar to the one below, you should still use small pops of color in wall art and other accents, but, in general, restraining the use of color can lead to a more subdued, calm, and relaxing environment for Mom and baby.


One of the ideas we had tossed around with Sarah regarding the decor of her nursery was painting a silhouette of a tree on one of the walls of the room. She is thinking of a gray and cream color palette since she and her husband, Dan, are not going to be finding out the sex of the baby. I thought a cream silhouette on a warm gray wall could be fun and playful while still maintaining a calm and sophisticated feel.

The images below show a few options that have already been designed that Camille and I could take our queue from for the design of Sarah's nursery mural... Camille thought an off-center tree that frames the crib would be a nice statement and I agree!


image via My Home Ideas

To wrap up my post, I wanted to offer one last image of a baby mobile I could not get enough of... the Peep Bird Mobile by Boon has cute little bird silhouette cutouts on individual wires cascading from a single wall mount. Adorable!

image via Pacifier

I've absolutely had a blast looking at all of the fantastic baby and nursery products out there and I cannot wait to sit down with Sarah and Camille and talk more about what Sarah has envisioned for her nursery.

I plan to highlight Sarah's nursery project in a few months when we have completed the design as a before and after project, so check back to see what Camille and I come up with.